 : Remember to assign the correct units of measure before entering data.
The vertical pump data section is specifically designed to capture engineering data associated with vertical type pumps for organizations taking advantage of the vertical pump selection capabilities in the Selector. This section provides an array of tables to populate specific sets of data to optimize vertical pump selections. Below are instructions on how to populate the tables as well as the list of the tables. For more details regarding the information expected and an example of each table, click on the table name.
To populate the vertical pump data:
In the navigational tree, open the Product line data folder.
Open the Product line folder for which the data is to be populated.
Open the Engineering data folder.
Open the Vertical pump data folder.
The vertical pump data table nodes will be displayed. To see an example, click here
Click on the node representing the table to access. (The data manager pane will display the table).
Populate the tables. See below for specific details on the individual tables and information on how to populate.
Important : Remember to assign the correct units of measure before entering data.
Below is the list of tables contained in the Vertical pump data engineering section, click on them for specific details and examples.
Pump size data This table captures bowl information for
the pump sizes. The table is strictly an input data table, no new columns
or rows can be added.
To populate the table:
1. In the navigational pane, open the Engineering data folder then the
Vertical pump data folder.
2. Click on the Pump size data node.
3. The data manage pane will display the table.
4. Simply enter the information for the following:
A. Bowl outside diameter - enter the outside diameter for the bowl.
B. Bowl exit diameter - enter the bowl inside exit diameter. This dimension
is used in calculating the exit losses between the bowl and column.
C. Bowl shaft diameter - enter the shaft diameters for the applicable
bowl assemblies. This dimension is used to determine
the shaft "step" between bowl shaft and lineshaft in order to
calculate shaft step thrust.
D. Bowl assembly length - enter the length of a single stage upper bowl
assembly. (not the first stage assembly length). This dimension is used
in calculating total pump length (TPL).
E. Bowl assembly weight - enter the weight of the bowl rotating assembly.
The weight will be used to calculate thrust.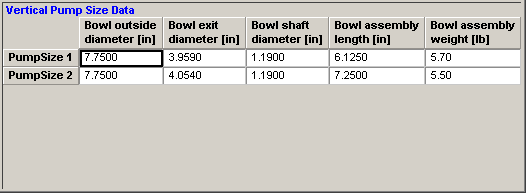
This images shows a populated Vertical Pump Size Data table.
Bowl assembly length, first stage This table captures the assembly length
of the first stage bowl. The length is usually taken from the lip of the
suction bell to the first stage bowl discharge..
To populate the table:
1. In the navigational pane, open the Engineering data folder then the
Vertical pump data folder.
2. Click on the Bowl assembly length , first stage node.
3. The data manager pane will display the table.
4. Enter a row rule.
5. Enter a column rule or rules.
6. Insert
the numbers of columns needed to populate your data.
7. Select or manually enter
rule criteria for the columns.
8. Enter data in the appropriate column-row
cell relationship. See the below example.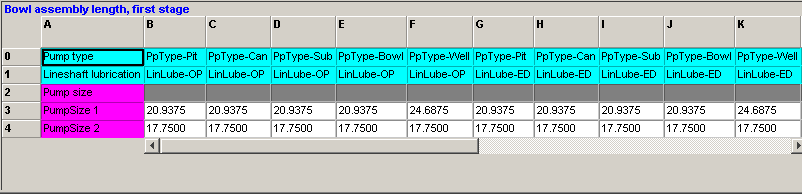
This image shows an example of a populated bowl assembly length, first
stage table in which the length is dependent on the pump size, pump type
(pit, can, etc) and type of lineshaft lubrication.
Bowl suction bearing hub length This table captures the length of the suction
hub bearing. The length is used in determining total pump length (TPL)
and can be a zero value.
To populate the table:
1. In the navigational pane, open the Engineering data folder then the
Vertical pump data folder.
2. Click on the Suction bearing hub length node.
3. The data manager pane will display the table
4. Enter a row rule.
5. Enter a column rule or rules.
6. Insert
the numbers of columns needed to populate your data.
7. Select or manually enter
rule criteria for the columns.
8. Enter data in the appropriate column-row
cell relationship. See the below example.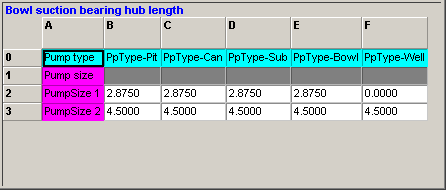
This image shows an example of a populated bowl suction bearing hub length
table in which the length is dependent upon the pump size and pump type.
Bowl suction to first stage impeller
eye This table captures the dimension of the
bowl suction to first stage impeller eye. The length is typically from
the suction bell to the first stage impeller eye. The value is used in
NPSH calculations.
To populate the table:
1. In the navigational pane, open the Engineering data folder then he Vertical
pump data folder.
2. Click on the Bowl suction to first stage impeller eye node.
3. The data manager pane will display the table
4. Enter a row rule.
5. Enter a column rule or rules.
6. Insert
the numbers of columns needed to populate your data.
7. Select or manually enter
rule criteria for the columns.
8. Enter data in the appropriate column-row
cell relationship. See the below example.
This image shows an example of a populated bowl suction to first stage
impeller eye table in which the length is dependent upon the pump size
and the pump type.
Column diameter, inner This table captures the inner column diameter
dimension. The dimension should not include the thickness of the material.
The value is used in several calculations in determining the appropriate
column sizing.
To populate the table:
1. In the navigational pane, open the Engineering data folder then the
Vertical pump data folder.
2. Click on the Column diameter, inner node.
3.. The data manager pane will display the table
4. Enter a row rule.
5. Enter a column rule or rules.
6. Insert
the numbers of columns needed to populate your data.
7. Select or manually enter
rule criteria for the columns.
8. If multiple column rules are being used, in the auto-upgrade sequence
field, insert the number for each rule (in ascending order) for which
the Selector should follow when determining the values.
9. Enter data in the appropriate column-row
cell relationship. See the below example.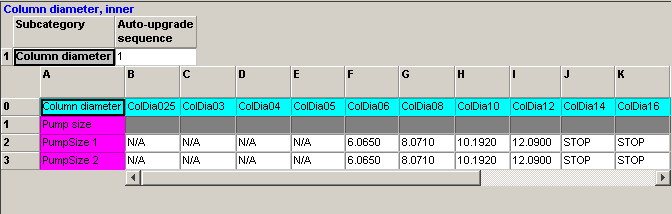
This image shows the column diameter inner table populated. The column
diameter lengths are based upon the pump size and column diameter sizes.
Additionally the column diameter will "upgrade" if necessary
to the first appropriate size.
Column internal obstruction diameter This table captures the largest internal
obstruction diameter dimension for the columns offered. The dimension
will be used in calculating the column friction rate for sizing the column.
See friction factor, column annulus for more information. For an open
lineshaft enter the lineshaft's diameter dimension, for an enclosed lineshaft
enter the outside diameter dimension for the enclosure.
To populate the table:
1. In the navigational pane, open the Engineering data folder then the
Vertical pump data folder.
2. Click on the Column internal obstruction diameter node.
3. The data manager pane will display the table
4. Enter a row rule.
5. Enter a column rule or rules.
6. Insert
the numbers of columns needed to populate your data.
7. Select or manually enter
rule criteria for the columns.
8. Enter data in the appropriate column-row
cell relationship. See the below example.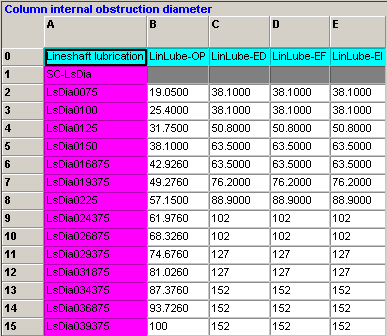
This image shows an example of a populate column internal obstruction diameter
table. The "diameters" are based on the lineshaft dimension
and lubrication type.
Column roughness coefficient This table captures the column roughness
coefficients for the column offered. This data will be used in calculating
the column friction rate in m/100m to correctly size
the column. See friction factor, column annulus for more information.
To populate the table:
1. In the navigational pane, open the Engineering data folder then the
Vertical pump data folder.
2. Click on the Column roughness coefficient node.
3. The data manager pane will display the table
4. Enter a row rule.
5. Enter a column rule or rules.
6. Insert
the numbers of columns needed to populate your data.
7. Select or manually enter
rule criteria for the columns.
8. Enter data in the appropriate column-row
cell relationship. See the below example.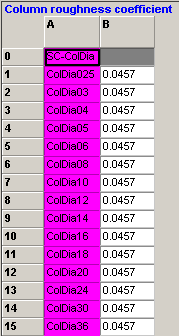
This image shows an example of a populated column roughness coefficient
table. The coefficients are simply based upon the column diameters.
Column pressure limit This table captures the maximum pressure
limits for the different column types offered. The Selector uses this
limit in determining the appropriate column for the working pressure.
To populate the table:
1. In the navigational pane, open the Engineering data folder then the
Vertical pump data folder.
2. Click on the Column pressure limit node.
3. The data manager pane will display the table
4. Enter a row rule.
5. Enter a column rule or rules.
6. Insert
the numbers of columns needed to populate your data.
7. Select or manually enter
rule criteria for the columns.
8. If multiple column rules are being used, in the auto-upgrade sequence
field, insert the number for each rule (in ascending order) for which
the Selector should follow when determining the values.
9. Enter data in the appropriate column-row
cell relationship. See the below example.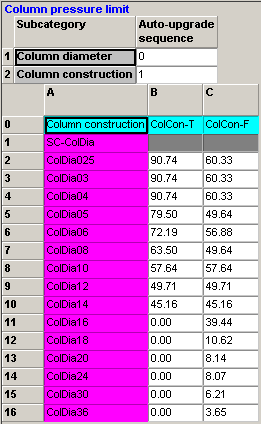
This image shows an example of a populated column pressure limit table.
The pressures are based upon the column diameter and column construction
(i.e. flanged or threaded). The Selector will automatically upgrade the
pressure based on the column construction not the column diameter as indicated
by the "1" in the Auto-upgrade sequence field.
Column to bowl adapter length If an adapter is necessary to attach
the bowl assembly to the column, this table captures the length of the
adapter. The lengths will be used in the calculation for total pump length.
To populate the table:
1. In the navigational pane, open the Engineering data folder then the
Vertical pump data folder.
2. Click on the Column to bowl adapter length node.
3. The data manager pane will display the table.
4. Enter a row rule.
5. Enter a column rule or rules.
6. Insert
the numbers of columns needed to populate your data.
7. Select or manually enter
rule criteria for the columns.
8. Enter data in the appropriate column-row
cell relationship. See the below example.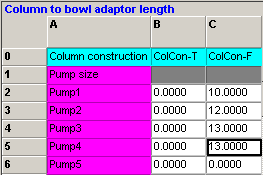
This image shows an example of a populated column to bowl adaptor length
table in which the lengths are based upon the pump size and column construction.
(i.e. threaded, flanged).
Minimum column length If there are minimum length requirement
for the columns, this table is used to capture those dimensions. The Selector
will use this information in determining the appropriate column length.
To populate the table:
1. In the navigational pane, open the Engineering data folder then the
Vertical pump data folder.
2. Click on the Minimum column length node.
3. The data manager pane will display the table
4. Enter a row rule.
5. Enter a column rule or rules.
6. Insert
the numbers of columns needed to populate your data.
7. Select or manually enter
rule criteria for the columns.
8. Enter data in the appropriate column-row
cell relationship. See the below example.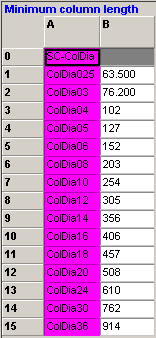
This image shows an example of a populated minimum column length table.
The lengths are simply dependent upon the column diameters.
Discharge head diameter,inner This table captures the inner diameter
dimensions for the discharge head types offered. The dimensions is used
in sizing the head and calculating the discharge
head friction losses.
To populate the table:
1. In the navigational pane, open the Engineering data folder then the
Vertical pump data folder.
2. Click on Discharge head diameter, inner node.
3. The data manager pane will display the table
4. Enter a row rule.
5. Enter a column rule or rules.
6. Insert
the numbers of columns needed to populate your data.
7. Select or manually enter
rule criteria for the columns.
8. If multiple column rules are being used, in the auto-upgrade sequence
field, insert the number for each rule (in ascending order) for which
the Selector should follow when determining the values.
9. Enter data in the appropriate column-row
cell relationship. See the below example.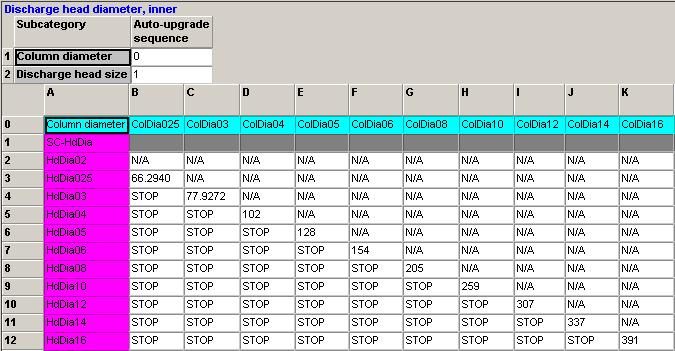
This example shows an example of a populated discharge head diameter, inner
table. The inner dimensions are based on the column diameter and head
diameter and the Selector "up-grade" sequence will be performed
based only on the discharge head size. N/A signifies
to the Selector to continue searching for an acceptable dimension, STOP
signifies to stop the search and downgrade to the last available dimension.
Discharge head height This table houses the discharge head
heights for the different discharge heads offered. The dimension is used
in calculating the lineshaft length for determining thrust.
To populate the table:
1. In the navigational pane, open the Engineering data folder then the
Vertical pump data folder.
2. Click on the Discharge head height node.
3. The data manager pane will display the table
4. Enter a row rule.
5. Enter a column rule or rules.
6. Insert
the numbers of columns needed to populate your data.
7. Select or manually enter
rule criteria for the columns.
8. Enter data in the appropriate column-row
cell relationship. See the below example.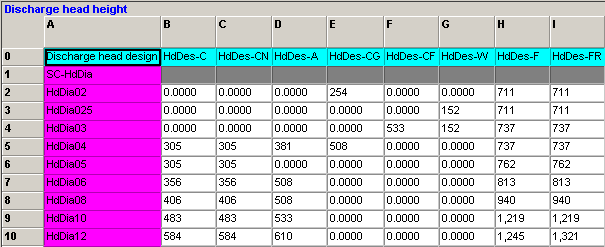
This image shows a populated discharge head height table for which the
heights are dependent upon the head design and diameters.
Discharge head stuffing box sleeve
diameter This table captures the dimension for
discharge head stuffing box sleeve diameters. The dimension is used in
calculating upthrust due to discharge pressure acting on the sleeve annulus.
To populate the table:
1. In the navigational pane, open the Engineering data folder then the
Vertical pump data folder.
2. Click on the discharge head stuffing box sleeve diameter node.
3. The data manager pane will display the table
4. Enter a row rule.
5. Enter a column rule or rules.
6. Insert
the numbers of columns needed to populate your data.
7. Select or manually enter
rule criteria for the columns.
8. Enter data in the appropriate column-row
cell relationship. See the below example.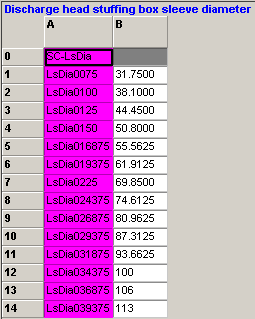
This image shows an example of a populated discharge head stuffing box
sleeve diameter table for which the diameters are dependent upon the different
lineshaft diameters.
Discharge nozzle centerline height This table
captures the discharge nozzle centerline height dimension which is measured
from the mounting surface to the centerline of the discharge flange  .
The dimension is used in calculating the head rated at the bowl, when
head is measured at the centerline of the discharge nozzle. This dimension
can be a positive or negative value.
.
The dimension is used in calculating the head rated at the bowl, when
head is measured at the centerline of the discharge nozzle. This dimension
can be a positive or negative value.
To populate the table:
1. In the navigational pane, open the Engineering data folder then the
Vertical pump data folder.
2. Click on the Discharge nozzle centerline height node.
3. The data manager pane will display the table.
4. Enter a row rule.
5. Enter a column rule or rules.
6. Insert
the numbers of columns needed to populate your data.
7. Select or manually enter
rule criteria for the columns.
8. Enter data in the appropriate column-row
cell relationship. See the below example.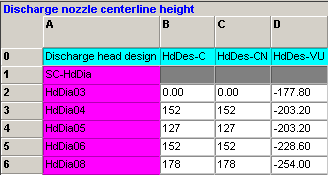
This image shows an example of a populated discharge nozzle centerline
height table in which the dimensions are dependent upon the discharge
head diameter and the discharge head design. The negative dimensions represent
a discharge flange which is located below the discharge column connection
flange.
Discharge head stick down This table captures the discharge head
stick down dimension which is measured from the base of the discharge
head to the attachment of the column or can. The dimension is used in
determining column or can length based on where head is measured. This
dimension can be a positive or negative value (a positive value represents
a stick down).
To populate the table:
1. In the navigational pane, open the Engineering data folder then the
Vertical pump data folder.
2. Click on the Discharge head stick down node.
3. The data manager pane will display the table.
4. Enter a row rule.
5. Enter a column rule or rules.
6. Insert
the numbers of columns needed to populate your data.
7. Select or manually enter
rule criteria for the columns.
8. Enter data in the appropriate column-row
cell relationship. See the below example.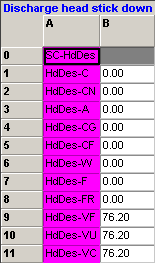
This image shows an example of a populated discharge head stick down table
in which the dimension is dependent upon the discharge head type. (HdDes-VF,
Hd-Des-VU, & Hd-Des-VC all have
a "stick down" of 76.20 mm).
Discharge head pressure limit This table captures the maximum allowable
pressure limits for the discharge heads.
To populate the table:
1. In the navigational pane, open the Engineering data folder then the
Vertical pump data folder.
2. Click on the discharge head pressure limit node.
3. The data manager pane will display the table.
4. Enter a row rule.
5. Enter a column rule or rules.
6. Insert
the numbers of columns needed to populate your data.
7. Select or manually enter
rule criteria for the columns.
8. Enter data in the appropriate column-row
cell relationship. See the below example.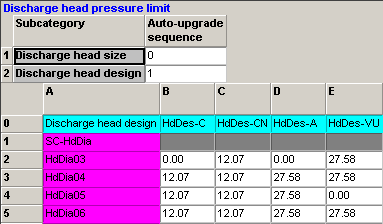
This image shows an example of a populated discharge
head pressure limit table. The pressures are based upon the discharge
head size and head design.. The head design will also "upgrade"
for pressure as indicated by the "1" in the Auto-upgrade sequence
field.
Friction factor, column annulus This table captures the column friction
factor. The factor will be used in calculating the column friction rate
in m/100m or % using the equations below: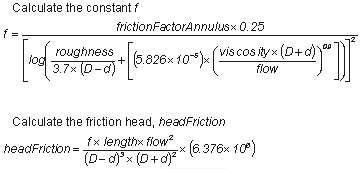
where:
" flow (m3/h)
" viscosity (cSt)
" roughness - column roughness coefficient
" length - column length (m)
" D - column diameter, inner (mm)
" d - column internal obstruction diameter (mm)
" frictionFactorAnnulus - friction factor, column
annulus
To populate the table:
1. In the navigational pane, open the Engineering data folder then the
Vertical pump data folder.
2. Click on the Friction factor, column annulus node.
3. The data manager pane will display the table.
4. Enter a row rule.
5. Enter a column rule or rules.
6. Insert
the numbers of columns needed to populate your data.
7. Select or manually enter
rule criteria for the columns.
8. Enter data in the appropriate column-row
cell relationship. See the below example.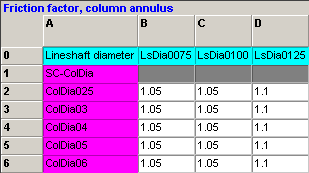
This image shows an example of a populated Friction factor, column annulus
table in which the factors are dependent upon the column and lineshaft
diameters.
K factor, can This table captures the dimensionless
coefficient K for the equation he
= Ke*V2/2g in determining head loss, where V2/2g is the standard equation for velocity head
base on average discharge outlet velocity (m).
To populate the table:
1. In the navigational pane, open the Engineering data folder then the
Vertical pump data folder.
2. Click on the K factor, can .
3. The data manager pane will display the table.
4. Enter a row rule.
5. Enter a column rule or rules.
6. Insert
the numbers of columns needed to populate your data.
7. Select or manually enter
rule criteria for the columns.
8. Enter data in the appropriate column-row
cell relationship. See the below example.
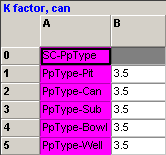
This image shows an example of a populated K factor, can table in which
the factors are dependent upon the pump type. (Pit, can, submersible,
bowl, & well).
K factor, discharge head This table captures the dimensionless
coefficient K for the equation he
= Ke*V2/2g in determining head loss, where V2/2g is the standard equation for velocity head
base on average discharge outlet velocity (m).
To populate the table:
1. In the navigational pane, open the Engineering data folder then the
Vertical pump data folder.
2. Click on the K factor, discharge head node .
3. The data manager pane will display the table.
4. Enter a row rule.
5. Enter a column rule or rules.
6. Insert
the numbers of columns needed to populate your data.
7. Select or manually enter
rule criteria for the columns.
8. Enter data in the appropriate column-row
cell relationship. See the below example.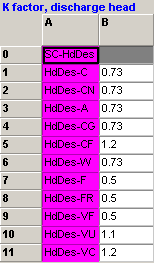
This image shows an example of a populated K factor, can table in which
the factors are dependent upon the different discharge head types.
Lineshaft bearing friction factor This table captures the friction factor
for the lineshaft bearing. The factor is used in calculating the power
loss of the lineshaft using the equation below:
powerLossLineshaft = (1.6266x10⁻⁸)
x diameterLineshaft1.89
x lengthLineshaft
x speedRatedActual x frictionFactorLineshaft.
For applications that have a non-zero factor when the lineshaft length
is zero, two factors can be defined in one table cell. They must be enclosed
with curly braces and separated by a colon.
{frictionFactorLineshaft0:frictionFactorLineshaft1}
In this case, the following equation is applied.

To populate the table:
1. In the navigational pane, open the Engineering data folder then the
Vertical pump data folder.
2. Click on the Lineshaft bearing friction factor node.
3.. The data manager pane will display the table
4. Enter a row rule.
5. Enter a column rule or rules.
6. Insert
the numbers of columns needed to populate your data.
7. Select or manually enter
rule criteria for the columns.
8. If multiple column rules are being used, in the auto-upgrade sequence
field, insert the number for each rule (in ascending order) for which
the Selector should follow when determining the values.
9. Enter data in the appropriate column-row
cell relationship. See the below example.
This image shows an example of a populated Lineshaft bearing friction factor
table in which the factors are dependent on the type of lineshaft lubrication.
(LinLube-OP = Open lineshaft, product lube, LinLube-ED
= enclosed lineshaft, drip feed oil lube, etc.)
Lineshaft diameter This table captures the outside lineshaft
diameter dimension. The dimension is used in several calculations in determining
the appropriate column sizing.
To populate the table:
1. In the navigational pane, open the Engineering data folder then the
Vertical pump data folder.
2. Click on the Lineshaft diameter node.
3.. The data manager pane will display the table
4. Enter a row rule.
5. Enter a column rule or rules.
6. Insert
the numbers of columns needed to populate your data.
7. Select or manually enter
rule criteria for the columns.
8. If multiple column rules are being used, in the auto-upgrade sequence
field, insert the number for each rule (in ascending order) for which
the Selector should follow when determining the values.
9. Enter data in the appropriate column-row
cell relationship. See the below example.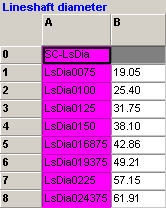
This image shows an example of a populated lineshaft diameter table in
which the diameters are dependent on the lineshaft diameters.
Lineshaft torque limit This table captures the lineshaft torque
limit (hp/100rpm or kW/1000rpm). The data is used in determining the appropriate
lineshaft diameter.
To populate the table:
1. In the navigational pane, open the Engineering data folder then the
Vertical pump data folder.
2. Click on the Lineshaft diameter node.
3.. The data manager pane will display the table
4. Enter a row rule.
5. Enter a column rule or rules.
6. Insert
the numbers of columns needed to populate your data.
7. Select or manually enter
rule criteria for the columns.
8. If multiple column rules are being used, in the auto-upgrade sequence
field, insert the number for each rule (in ascending order) for which
the Selector should follow when determining the values.
9. Enter data in the appropriate column-row
cell relationship. See the below example.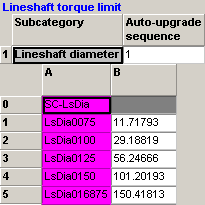
This image shows an example of a populated lineshaft torque limit table
in which the limits are dependent on the lineshaft diameters and will
"auto-upgrade" based on the lineshaft diameters as indicated
by the "1" in the Auto-upgrade sequence field.
Lineshaft weight This table captures the weight of the
lineshaft which will be used in determining thrust.
To populate the table:
1. In the navigational pane, open the Engineering data folder then the
Vertical pump data folder.
2. Click on the Lineshaft weight node.
3.. The data manager pane will display the table
4. Enter a row rule.
5. Enter a column rule or rules.
6. Insert
the numbers of columns needed to populate your data.
7. Select or manually enter
rule criteria for the columns.
8. If multiple column rules are being used, in the auto-upgrade sequence
field, insert the number for each rule (in ascending order) for which
the Selector should follow when determining the values.
9. Enter data in the appropriate column-row
cell relationship. See the below example.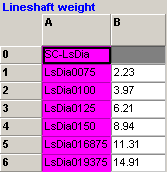
This image shows an example of a populated Lineshaft weight table in which
the weights are dependent upon the lineshaft diameters (LsDai0075, LsDia0100,
etc).
Minimum clearance below suction This table captures the dimension of
the minimum acceptable clearance below suction measured from the suction
bell lip to the sump floor (we assume that this dimension is greater than
the bowl
suction bearing hub length dimension)
or from the bottom of suction strainer to the sump floor . This dimension is
used in determining a suitable total pump length for sump applications.
To populate the table:
1. In the navigational pane, open the Engineering data folder then the
Vertical pump data folder.
2. Click on the Minimum clearance below suction node.
3.. The data manager pane will display the table
4. Enter a row rule.
5. Enter a column rule or rules.
6. Insert
the numbers of columns needed to populate your data.
7. Select or manually enter
rule criteria for the columns.
8. If multiple column rules are being used, in the auto-upgrade sequence
field, insert the number for each rule (in ascending order) for which
the Selector should follow when determining the values.
9. Enter data in the appropriate column-row
cell relationship. See the below example.
![]()
This image shows an example of a populated Minimum clearance below suction
table in which the dimension is dependent upon the pump size and suction
strainer (SuctStr-N = none, SuctStr-F
= fitted).
Strainer length This table captures the overall lengths
for all applicable suction strainers.
To populate the table:
1. In the navigational pane, open the Engineering data folder then the
Vertical pump data folder.
2. Click on the Strainer length node.
3.. The data manager pane will display the table
4. Enter a row rule.
5. Enter a column rule or rules.
6. Insert
the numbers of columns needed to populate your data.
7. Select or manually enter
rule criteria for the columns.
8. If multiple column rules are being used, in the auto-upgrade sequence
field, insert the number for each rule (in ascending order) for which
the Selector should follow when determining the values.
9. Enter data in the appropriate column-row
cell relationship. See the below example.
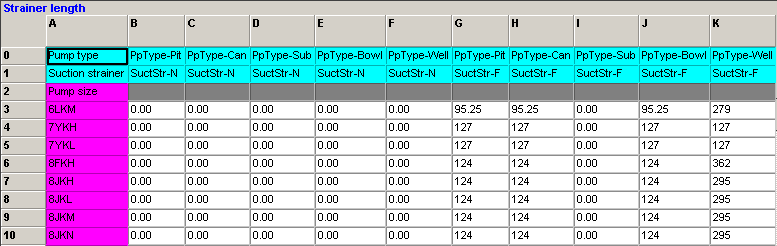
This image show an example of a populated Strainer length table in which
the lengths are determined by the pump size, pump type, and suction strainer.
(SuctStr-N = None, SuctStr_F = Fitted).
Suction bell diameter This table captures the outside suction
bell diameter dimension. This dimension is used in determining obstruction
diameters when using in a well or can.
To populate the table:
1. In the navigational pane, open the Engineering data folder then the
Vertical pump data folder.
2. Click on the Suction bell diameter node.
3.. The data manager pane will display the table
4. Enter a row rule.
5. Enter a column rule or rules.
6. Insert
the numbers of columns needed to populate your data.
7. Select or manually enter
rule criteria for the columns.
8. If multiple column rules are being used, in the auto-upgrade sequence
field, insert the number for each rule (in ascending order) for which
the Selector should follow when determining the values.
9. Enter data in the appropriate column-row
cell relationship. See the below example.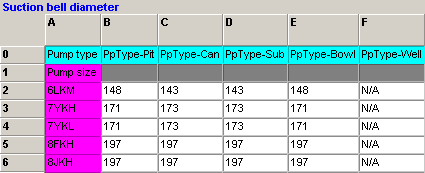
This image shows an example of a populated Suction bell diameter table
in which the diameters are determined by the pump size and type (Pit,
can, submersible, bowl, & well).
This table captures lengths for submersible motors which are necessary to be included in the total pump length calculation. If applicable, the length is added to the motor adaptor length for a total motor length. [Total motor length = submersible motor length + submersible motor adaptor length]. Should the vertical product line, for which this information is populated, support multiple pump types the table design would typically include the predefined product line option PpType-Sub to identify a submersible application.
Note: This table does not support auto upgrade functionality.
For length strategies:
Pump length, sump depth, or can length - The calculated column length will be reduced by the value of the total motor length such that the total pump length (including the total motor length) meets the length requirements.
Column length, low liquid level, or as required for NPSH - The total motor length will be included in the total pump length calculation. The calculated column length will not be reduced as above.
To populate the table:
In the navigational pane, open the Engineering data folder then the Vertical pump data folder.
Click on the Submersible motor length node.
The data manager pane will display the table.
Enter a row rule.
Enter a column rule or rules.
Insert the numbers of columns needed to populate your data.
Select or manually enter rule criteria for the columns.
Enter data in the appropriate column-row cell relationship. See the examples below.
NOTE: When defining driver power, it is recommended that the variables Driver Power (hp) or Driver Power (kW) be utilized en lieu of Hp Min Req or kW Min Req. This is recommended as vertical motors are typically supplied with a 1.15 service factor, which the end user may specify to utilize. In which case, hp min req may be too high, if the customer’s wishes are to be met
Vertical “submersible” product line
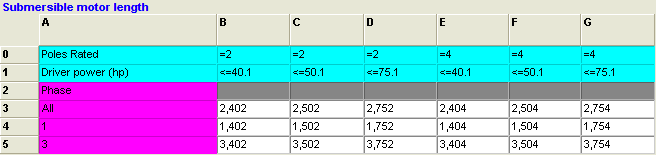
This image shows motor lengths driven by poles, driver power (hp) and phase.
Vertical product line supporting multiple pump types
This image shows motor lengths driver by poles, driver power (hp), phase, and the pump type. If the pump type selected in the Selector is other than submersible, the motor length values will equal “0”.
Submersible motor adaptor length
This table captures the lengths for motor adapters which are necessary to be include in the total pump length calculation. If applicable, the length is added to the submersible motor length to calculate a total motor length. [Total motor length = submersible motor length + submersible motor adaptor length]. Should the vertical product line, for which this information is populated, support multiple pump types the table design would typically include the predefined product line option PpType-Sub to identify a submersible application.
Note: This table does not support auto upgrade functionality.
To populate the table:
1. In the navigational pane, open the Engineering data folder then the Vertical pump data folder.
2. Click on the Submersible motor adapter length node.
3. The data manager pane will display the table.
4. Enter a row rule.
5. Enter a column rule or rules.
6. Insert the numbers of columns needed to populate your data.
7. Select or manually enter rule criteria for the columns.
8. Enter data in the appropriate column-row cell relationship. See the examples below.
Vertical “submersible” product line
This image shows motor adapter lengths driven by poles, driver power (hp) and phase.
Vertical product line supporting multiple pump types
 This image shows motor adapter lengths driver
by poles, driver power (hp), phase, and the pump type. If the pump type
selected in the Selector is other than submersible, the motor adapter
length values will equal “0”.
This image shows motor adapter lengths driver
by poles, driver power (hp), phase, and the pump type. If the pump type
selected in the Selector is other than submersible, the motor adapter
length values will equal “0”.
Suction
nozzle centerline height This table captures the height dimension
from the bottom of the mounting flange to the suction nozzle centerline.
The dimension should be negative when the suction nozzle is below the
mounting surface This dimension is used in NPSH calculations.
To populate the table:
1. In the navigational pane, open the Engineering data folder then the
Vertical pump data folder.
2. Click on the Suction nozzle centerline height node.
3.. The data manager pane will display the table
4. Enter a row rule.
5. Enter a column rule or rules.
6. Insert
the numbers of columns needed to populate your data.
7. Select or manually enter
rule criteria for the columns.
8. If multiple column rules are being used, in the auto-upgrade sequence
field, insert the number for each rule (in ascending order) for which
the Selector should follow when determining the values.
9. Enter data in the appropriate column-row
cell relationship. See the below example.
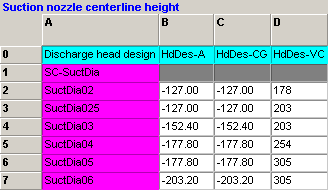
This image shows an example of a populated Suction nozzle centerline height
table in which the heights are based upon the Suction Diameters (SuctDia02,
SuctDia025, etc.) and the Discharge head design. Notice for the HdDes-A
& HdDes-CG discharge heads, the lengths are negative
because the suction nozzle is located below the mounting flange.
Suction nozzle
diameter, inner This table captures the inside suction
nozzle diameter dimension. This is used in sizing the suction nozzle basis
liquid velocity limits.
To populate the table:
1. In the navigational pane, open the Engineering data folder then the
Vertical pump data folder.
2. Click on the Suction nozzle diameter, inner node.
3.. The data manager pane will display the table
4. Enter a row rule.
5. Enter a column rule or rules.
6. Insert
the numbers of columns needed to populate your data.
7. Select or manually enter
rule criteria for the columns.
8. If multiple column rules are being used, in the auto-upgrade sequence
field, insert the number for each rule (in ascending order) for which
the Selector should follow when determining the values.
9. Enter data in the appropriate column-row
cell relationship. See the below example.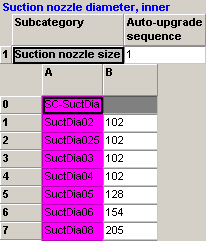
This image shows an example of a populated Suction nozzle diameter, inner
table in which the diameters are based upon the suction nozzle sizes.
In this case the suction nozzle will Auto-upgrade to the first acceptable
nozzle size for the conditions of service.
Can diameter, inner This table captures the minimum internal
can diameter dimensions. The Selector will calculate the minimum diameter
required for the liquid velocity and then determine
the appropriate can diameter from the table.
To populate the table:
1. In the navigational pane, open the Engineering data folder then the
Vertical pump data folder.
2. Click on the Can diameter, inner node.
3.. The data manager pane will display the table
4. Enter a row rule.
5. Enter a column rule or rules.
6. Insert
the numbers of columns needed to populate your data.
7. Select or manually enter
rule criteria for the columns.
8. If multiple column rules are being used, in the auto-upgrade sequence
field, insert the number for each rule (in ascending order) for which
the Selector should follow when determining the values.
9. Enter data in the appropriate column-row
cell relationship. See the below example.
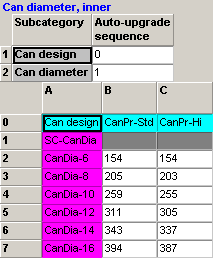
This image shows an example of a populated Can diameter, inner table in
which the diameters are based upon the can diameters (CanDia-6, CanDia8,..)
and the can design (CanPr-Std = standard can, CanPr-Hi
= high pressure can). The Selector will automatically upgrade using the
can diameters (to the first acceptable diameter) as directed by the "1"
in Can diameter Auto-upgrade sequence field.
Can pressure limit This table captures the maximum allowable
pressure limits for the different cans offered.
To populate the table:
1. In the navigational pane, open the Engineering data folder then the
Vertical pump data folder.
2. Click on the Can pressure limit node.
3. The data manager pane will display the table.
4. Enter a row rule.
5. Enter a column rule or rules.
6. Insert
the numbers of columns needed to populate your data.
7. Select or manually enter
rule criteria for the columns.
8. Enter data in the appropriate column-row
cell relationship. See the below example.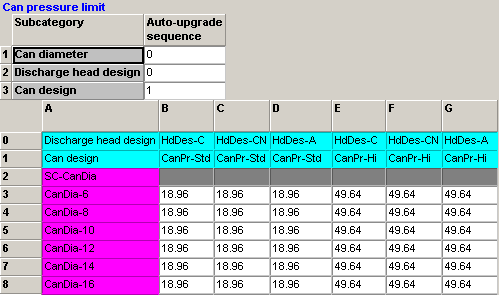
This image shows an example of a populated Can pressure limit table in
which the pressure limits are dependent upon the can diameters (CanDia-6,
CanDia-8, ...), can design (CanPr-Std = standard and
CanPr-Hi = high pressure), and the discharge head design.
The Selector will automatically upgrade the pressures for the can design
as directed by the "1" in the Auto-upgrade sequence field.
Well diameter, minimum allowed This table captures the minimum allowable
well diameter.
To populate the table:
1. In the navigational pane, open the Engineering data folder then the
Vertical pump data folder.
2. Click on the Well diameter, minimum allowed node.
3.. The data manager pane will display the table
4. Enter a row rule.
5. Enter a column rule or rules.
6. Insert
the numbers of columns needed to populate your data.
7. Select or manually enter
rule criteria for the columns.
8. If multiple column rules are being used, in the auto-upgrade sequence
field, insert the number for each rule (in ascending order) for which
the Selector should follow when determining the values.
9. Enter data in the appropriate column-row
cell relationship. See the below example.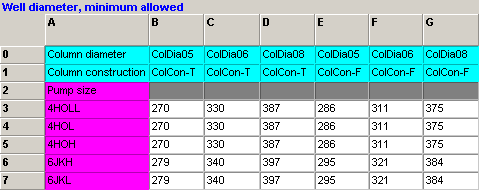
This image shows an example of a populated Well diameter, minimum allowed
table in which the diameters are dependent upon the pump size, column
construction (threaded or flanged), and the column diameters.
Thrust bearing capacity This table captures
the thrust limit of bearings. It is used in conjunction with the bearing
type and bearing size product line options.
To populate the table:
1. In the navigational pane, open the Engineering data folder then the
Vertical pump data folder.
2. Click on the Thrust bearing capacity node.
3. The data manager pane will display the table.
4.Enter a row rule.
5. Enter a column rule or rules.
6. Insert
the numbers of columns needed to populate your data.
7. Select or manually enter
rule criteria for the columns.
7. Select or manually enter rule criteria for the columns.
8. Enter data in the appropriate column-row cell relationship. See the
below example.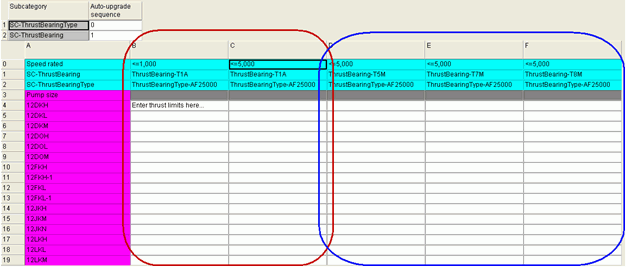
This image shows an example of a thrust bearing capacity table. The auto-upgrade
is set to upgrade the bearing size when a limit is exceeded.
• For
bearings where the thrust limit is typically dependant on speed (because
it is typically back calculated from a required bearing life limit), the
table will need to be setup as shown by the red rectangle. In
summary:
o
Two columns of identical bearing options will be created
o
Two speed values will be defined (minimum possible speed and maximum possible
speed).
o
The thrust values for the specified speeds will be populated in the table.
The Selector will determine the correct thrust
value by interpolating between the two values using the actual rated speed
of the selection.
• For bearings where the
thrust limit is not dependant on speed, the table will need to be setup
as shown by the blue rectangle. In summary:
o
Only one speed value will be defined (maximum possible speed).
o
The thrust value will simply be the thrust limit of the bearing (independent
of speed).
o
If the thrust limits for ALL bearings in the table are independent of
speed, then the speed rule (row) is not necessary.
Thrust Balanced Stages - For applications
making use of the thrust balancing functionality, this table is used to
define the different quantities of balanced stages available for each
pump size. The table applies auto-upgrade to a “quantity of balanced stages”
subcategory to determine the minimum number of balanced stages needed
for a selection. See the example below.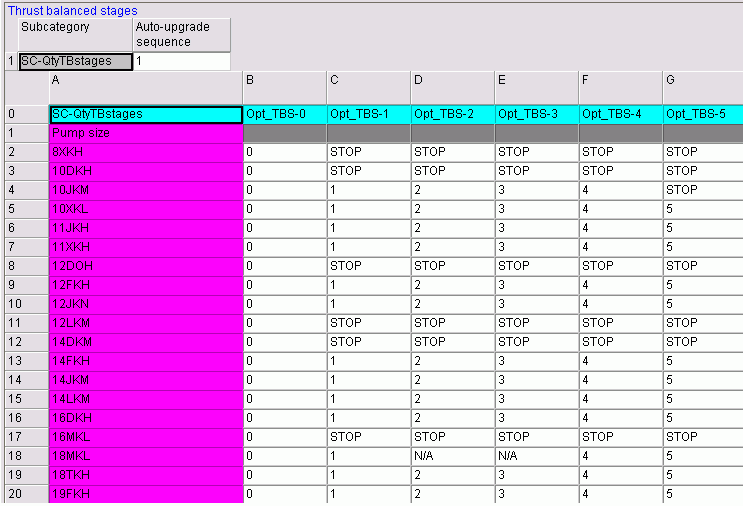
“N/A” will cause an instant upgrade, while “STOP” will cause a downgrade
and end the sequence. For example, 8XKH cannot use any thrust balanced
stages, so STOP is written for column C, making zero stages the only result.
18MKL cannot use two or three balanced stages, but is compatible with
just one, four, or five. Having N/A in columns D and E will cause the
sequence to skip those columns and upgrade directly from one to four stages.